Why Choose Universal Light Bar Brackets?

Choosing the right Light Bar Brackets can determine how securely and effectively auxiliary lighting performs. A powerful light bar is only as dependable as its mounting system. Weak brackets may vibrate on rough roads, shift the beam, or create distracting noise near the roof or grille.

Universal brackets offer practical flexibility for trucks, SUVs, work vehicles, and off-road builds. Their adjustable holes and multiple mounting positions can fit different light bar sizes and vehicle layouts. Experienced installers usually check the bracket material, bolt quality, load capacity, and resistance to corrosion before installation. Stainless steel and properly coated aluminum often perform well in demanding outdoor conditions. Still, no bracket suits every vehicle.

That detail matters.

A reliable installation begins with accurate measurements. Check the available mounting space, roof clearance, cable path, and the angle of the light bar. Tighten fasteners evenly, then inspect them after driving on gravel or uneven surfaces. This simple review can reveal movement before it becomes a safety concern. Manufacturer specifications should guide the final decision, especially when the vehicle carries additional equipment.

Universal design does not mean effortless compatibility. Some brackets may require spacers, drilling, or minor adjustment. That can be frustrating. However, honest evaluation prevents expensive mistakes and improves long-term performance. Selecting Light Bar Brackets from a reputable supplier also provides clearer dimensions, material information, and installation guidance. The best choice balances strength, fit, appearance, and serviceability, rather than focusing on price alone. A careful mounting system keeps the light stable, protects the vehicle, and supports confident driving in challenging conditions.
Why Choose Universal Light Bar Brackets?

What Are Universal Light Bar Brackets?

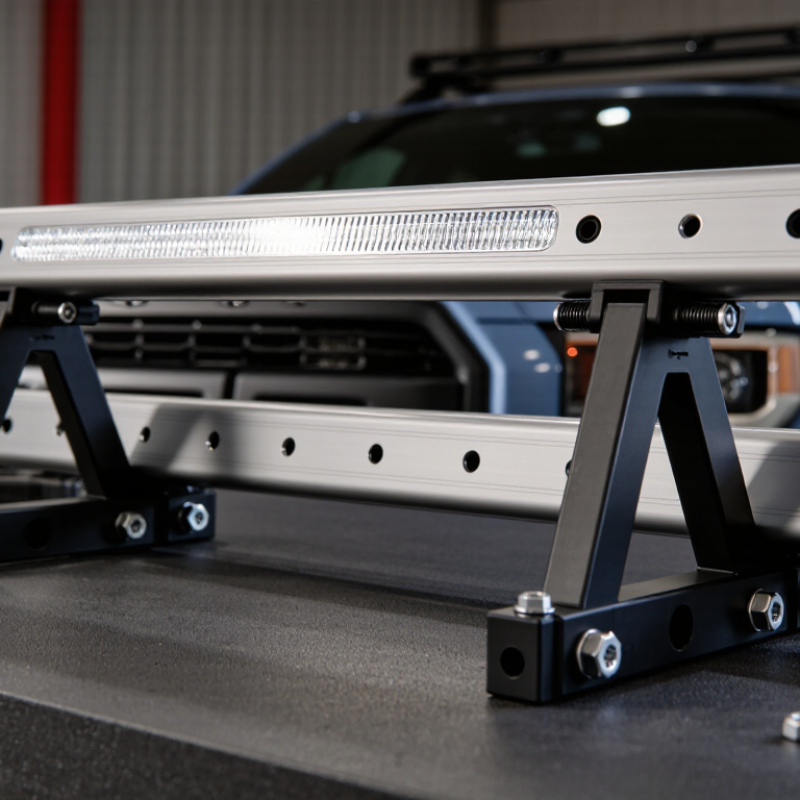
Universal light bar brackets are adjustable mounting components for fitting auxiliary LED bars to different vehicles and support surfaces. They usually include slotted holes, clamp areas, bolts, and protective pads. The slots allow small position changes when roof rails, bumpers, or mounting plates differ.

In practical installation, bracket flexibility matters more than appearance. A universal design can accommodate several bolt patterns and help center the light bar above a windshield or grille. It also simplifies replacement when a vehicle changes. I have found that uneven tightening creates more trouble than difficult drilling. The beam may shake, tilt, or point into the road surface.

Material selection remains important. Aluminum reduces weight, while coated steel often handles impact better. The U.S. Department of Energy reports that LED lighting can use at least 75% less energy than incandescent lighting. Lower electrical demand can reduce wiring stress, but the bracket still needs firm support. SAE J575 testing procedures examine vibration, moisture, dust, and corrosion resistance for vehicle lighting equipment. Brackets should not be treated as decorative hardware.

Fit is never universal in the literal sense. Check bar width, bolt diameter, clearance, and load limits before installation. Weather seals and rubber washers can reduce movement and water entry. Still, rubber can compress over time. Recheck the fasteners after the first drive, especially on corrugated roads. A clean installation is useful, but it may not be perfect.
Why Choose Universal Light Bar Brackets?

Universal light bar brackets are adjustable mounting components designed to fit light bars with different nominal lengths and mounting positions. The chart shows common light bar lengths and their exact metric equivalents, helping users select compatible brackets and installation hardware.

Length conversions use the exact standard conversion: 1 inch = 2.54 centimeters. Bracket compatibility should also be checked against mounting-hole spacing, slot adjustment range, vehicle surface, and load capacity.

How Universal Light Bar Brackets Fit Different Vehicles

Universal light bar brackets are designed to fit different vehicles without requiring a completely new mounting system. Their adjustable holes, sliding channels, and varied hardware support many roof, grille, bumper, and utility-bar layouts. However, “universal” does not mean every bracket fits perfectly. Vehicle width, mounting depth, bolt spacing, and available clearance still matter.

In my installation experience, measuring first prevents most problems. Check the mounting surface with the vehicle parked on level ground. A bracket may fit the bolt pattern but still touch the hood, roof, wiring, or cooling components. Strong steel or aluminum construction can improve stability, while rubber washers may reduce vibration and rattling. I once focused too much on width and overlooked the bracket’s height. The light sat higher than expected. It looked acceptable, but airflow and clearance needed another review.

Tips: Measure twice. Test-fit before tightening. Use locking washers where appropriate. Keep wiring away from sharp edges and hot surfaces. After installation, inspect the light bar after a short drive and retighten loose hardware. Check the vehicle’s load limits and local road-use requirements. Different vehicles react differently to vibration, especially on rough roads.

Key Benefits of Choosing a Universal Mounting System

Universal light bar brackets make installation more adaptable across trucks, utility vehicles, and off-road platforms. A universal mounting system uses adjustable holes, sliding plates, or flexible clamp positions. This design helps fit different roof widths and mounting points. It can reduce fabrication time during installation. It also simplifies future upgrades when a larger or smaller light bar is selected. In my installation experience, fitment becomes easier when bracket measurements are checked before unpacking the tools. Small errors still happen.

A well-designed bracket should balance strength, alignment, and service access. Thick steel or reinforced aluminum can resist vibration, while protective coatings help manage moisture and road debris. The bracket should hold the light bar firmly without crushing its housing. Proper hardware matters too. Locking nuts and correctly sized washers can reduce loosening on rough roads.

However, “universal” does not mean automatically compatible. Vehicle curvature, load limits, drilling requirements, and wiring routes must be inspected carefully. I once underestimated roof flex. The light worked, but the beam angle needed adjustment.

Tips: Measure twice, and record every dimension. Test-fit the bracket before tightening hardware. Keep wiring away from sharp edges and hot surfaces. Use a torque wrench when specifications are provided. Leave enough clearance for cleaning and maintenance. A small alignment check at night can reveal glare, vibration, or uneven illumination that daytime testing may miss.

Materials, Compatibility, and Installation Considerations

Why Choose Universal Light Bar Brackets?

Materials, Compatibility, and Installation Considerations

Universal light bar brackets appeal to drivers who need flexible mounting options without replacing the entire vehicle setup. Their value depends heavily on material quality. Powder-coated steel offers strong support and resists surface corrosion. Aluminum weighs less, but it may flex under heavy vibration. Stainless steel handles moisture well, although it can increase cost and weight.

The term universal is not absolute. A bracket may fit several light bar widths, yet fail against a particular roof rail or bumper profile. Measure the bar, mounting surface, bolt spacing, and available clearance before purchasing. I have seen a bracket fit the light perfectly but interfere with a hood or grille. That small mistake created unnecessary adjustment work.

Installation should leave no guesswork. Use hardware rated for outdoor exposure and match the bolt length to the mounting surface. Tighten fasteners evenly, then check the assembly after the first drive. A torque wrench is helpful, but many users skip it. I have done that myself, and vibration later exposed a loose connection. Rubber washers can reduce rattling and protect painted surfaces. The bracket should remain stable without crushing thin panels. Inspect welds, edges, and coating damage before installation. A simple test at low speed can reveal movement before regular driving begins.

How to Select the Right Universal Light Bar Brackets

Why Choose Universal Light Bar Brackets?

How to Select the Right Universal Light Bar Brackets

Universal light bar brackets simplify installation when vehicle dimensions or mounting points change. However, “universal” does not mean universally suitable. Measure the bar width, bolt spacing, roof channel, and available clearance before buying. A bracket that shifts two millimeters can create vibration, noise, or uneven beam alignment. I have found that paper measurements often miss curved roofs and hidden reinforcement. Check the vehicle directly.

Material and load capacity deserve careful attention. Stainless steel resists corrosion, while coated carbon steel can provide strong support at a lower cost. Examine thickness, weld quality, slot length, and fastener size. The U.S. Department of Energy reports that LED lighting can use at least 75% less energy and last up to 25 times longer than incandescent lighting. That efficiency reduces electrical demand, but it does not reduce bracket stress. Calculate the light’s weight, wind exposure, and driving conditions together.

Look for brackets tested against vibration and corrosion. SAE J575 outlines environmental tests for vehicle lighting equipment, including vibration and moisture exposure. A bracket should also preserve safe hood, door, antenna, and roof clearance. Select adjustable designs only when their locking hardware remains secure after tightening. Recheck bolts after the first drive. Small oversights matter. I once underestimated wind noise from a narrow gap, and the correction required removing the entire assembly. According to IEC 60529 principles, sealed electrical parts should match the required ingress protection level, but the bracket itself still needs drainage and routine inspection.

Why Choose Universal Light Bar Brackets? - How to Select the Right Universal Light Bar Brackets

Selection Dimension Recommended Choice Practical Specifications and Benefits What to Confirm Before Purchase
Vehicle Mounting Location Roof, windshield pillar, grille, bumper, hood, and bed-rail brackets are designed for different attachment points. Roof and pillar mounts generally provide a higher beam position, while bumper and grille mounts offer a lower forward-facing installation. Check available mounting holes, clearance, access to fasteners, and whether drilling is permitted.
Light Bar Length Common light-bar lengths include approximately 6, 12, 20, 30, 40, 50, and 52 inches. Adjustable universal brackets can accommodate a range of widths, but the adjustment range must include the light bar’s mounting points. Measure the center-to-center distance between the light bar’s mounting holes rather than relying only on the overall bar length.
Bracket Material Steel brackets usually provide high rigidity and impact resistance. Aluminum brackets are lighter and naturally resistant to corrosion. A protective powder coating or anodized finish can improve resistance to moisture, road salt, and UV exposure. Review material thickness, surface treatment, edge quality, and resistance to the intended operating environment.
Load Capacity The bracket should support the complete light assembly, including the lamp, hardware, wiring, and any vibration loads. A practical selection should provide capacity above the static weight of the installed light bar. Compare the stated bracket capacity with the light bar weight and consider wind load, off-road vibration, and repeated impacts.
Adjustment Range Slotted holes and pivoting joints allow the light bar to be centered, raised, lowered, or tilted. Adjustment is useful when vehicle body shapes and light-bar mounting patterns differ. Confirm slot length, pivot angle, adjustment direction, and whether the final position can be locked securely.
Fastener Compatibility Automotive light-bar brackets commonly use metric or inch-based fasteners depending on the vehicle and light assembly. Slotted mounting holes can improve fit, but they do not replace correct bolt diameter and thread engagement. Verify bolt diameter, thread pitch, washer size, nut type, and the required tightening torque.
Vibration Resistance Triangulated supports, short unsupported spans, reinforced bends, and locking fasteners can reduce movement and fatigue. A rigid bracket helps maintain beam alignment on rough roads. Look for reinforcement near bends and mounting holes, and use suitable locking nuts or thread-locking methods where appropriate.
Weather and Corrosion Protection Brackets exposed to rain, mud, snow, and road salt require a durable protective finish. Drainage, covered fasteners, and corrosion-resistant hardware can extend service life. Confirm whether the coating is intended for exterior use and inspect cut edges or drilled areas for exposed metal.
Aerodynamic and Noise Considerations A compact bracket with limited exposed surface area can reduce wind noise and aerodynamic drag. Positioning the light bar close to a suitable mounting surface may also reduce vibration. Check roof clearance, sunroof operation, antenna location, windshield visibility, and potential airflow noise.
Electrical Clearance The bracket should not pinch, cut, or excessively bend the light bar cable. Adequate clearance helps protect insulation from sharp edges, heat sources, moving panels, and abrasion. Plan the cable route, use edge protection where needed, and keep wiring away from exhaust components and moving parts.
Installation Method Bolt-on brackets can use existing vehicle mounting points and are generally easier to remove or reposition. Drilling or permanent modification may provide additional strength but can affect corrosion protection and vehicle structure. Determine whether the vehicle has suitable factory holes and follow the vehicle manufacturer’s structural and safety requirements.
Legal and Safety Requirements Rules for auxiliary lighting can differ by location and may cover lamp height, color, beam direction, road use, covers, and visibility to other drivers. Correct bracket positioning helps keep the beam properly aimed. Review applicable traffic, lighting, inspection, and off-road-use regulations before installation.

Selection guidance: Choose a universal light bar bracket only when its mounting range, material strength, fastener compatibility, vehicle clearance, and intended load all match the installation. Actual capacity and fit depend on the bracket design, vehicle structure, light-bar weight, and installation method.